"Problem: Because my items are meant to be worn, I really need to have them modelled."
I spoke with my younger brother's fiance and four work friends and all were happy to be my models. They would represent my focus customer base very well, I think. I'm still working out what payment options I will offer, but am leaning towards giving them a choice between: a) a discount on future jewelry purchases, or b) free items from a selection of jewelry. I mentioned the possibility of this choice and each seemed more than happy with it (though none expected payment). I'm very fortunate to have people like them in my life.
"Problem: Promoting my items and finding more venues."
I spoke with one of my friends (and model-to-be) and she gave me a number of avenues to look into, both in specific festivals/events and locations. She definitely gave me a lot to look into and said she's willing to offer up more as well as going on hunting expeditions for stores that might be willing to carry my jewelry.
Monday, January 30, 2012
Saturday, January 28, 2012
Problems and Solutions
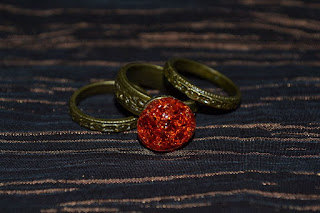
I've been itching to try out some of the things I've been learning in my online searches about doing better on Etsy sales. One thing was to finally get new and better photos.
The problem: I need a white box. My daily schedule doesn't give me many day light hours after work or before I pick up my kids from daycare. Due to this, I tend to have to rely on artificial lights, which don't work well on their own.
The solution: First, I've found tutorials on how to make ones that would work for artificial lights. That would help to a degree, especially when used in conjuction with photo editting programs like Picnik. I was fairly pleased with this free online tool when I played with it tonight. I also decided that, if nothing else, I can use the smallest room in my apartment, which is fairly empty, has plain white walls, and a window that allows a nice amount of light in. In a sense, it would be a fairly large white box. I can add tracing or tissue paper to the window to diffuse the light and prevent too much reflection or glare. I tried it out today and was happy with the improved results over my usual photos.
My 12 year old niece (who also makes jewelry) was watching me work on the new images on Picnik and helped give opinions as I tinkered around. It says something that after seeing the "After" image above, she shuddered when I showed her the "Before" image.
Problem: Because my items are meant to be worn, I really need to have them modelled.
(Possible) Solution: I've talked to two people about possibly modelling some of my pieces, a friend at work and my younger brother's fiance. They both seemed fine with the idea. Not sure how I would pay them. My friend said she didn't need money or a discount, but couldn't resist when I said I could give her free jewelry. What can I say? She likes my stuff! ;-)
I have a couple other people I can possibly talk to about modelling my items. I really do like keeping it to people I know, at least for now.
Problem: Promoting my items and finding more venues. I'm having a heck of a time finding vending events (like craft fairs and consignment shops). I also don't have the time to go to "local coffee shops on open mike nights" too often because of my busy schedule.
(Possible) Solution: Talk to some of the poeple I know who vend at events; they may be willing to give me ideas on how to find these things.
Problem: There's the idea of giving some of your items to well known singers and such and also possibly loaning some to local photographers in exchange for them to refer people your way (and free or discounted images of your items being used by models).
(Possible) Solution: Think about the people I do know and who they might know. My sister owns Cleopatra's Closet and she's also a well known belly dancer in her area. She has a lot of belly dancer friends, knows a number of photographers, and has connections throughout the US and abroad. She may be able to refer me to a few that I can contact. There's also a few other dancers I know. I may also have artistic connections in other areas as well. I need to put out my feelers.
Another possibility is to contact several of the authors/owners of the bigger blogs I visit and ask about doing a giveaway through them. It's a fast way to get exposure. Something to consider.
I think my biggest problem is... I don't promote myself enough. I have quality items and I am proud of what I make. I need to be more proactive about selling them.
The main thing is this (and this is what I told my husband today):
It's about creating, but what's the point in creating if you can't share it. How can I share it, though, if I can't fund it. That's why I need to sell more; so I can afford to get the supplies to create more.
The problem: I need a white box. My daily schedule doesn't give me many day light hours after work or before I pick up my kids from daycare. Due to this, I tend to have to rely on artificial lights, which don't work well on their own.
The solution: First, I've found tutorials on how to make ones that would work for artificial lights. That would help to a degree, especially when used in conjuction with photo editting programs like Picnik. I was fairly pleased with this free online tool when I played with it tonight. I also decided that, if nothing else, I can use the smallest room in my apartment, which is fairly empty, has plain white walls, and a window that allows a nice amount of light in. In a sense, it would be a fairly large white box. I can add tracing or tissue paper to the window to diffuse the light and prevent too much reflection or glare. I tried it out today and was happy with the improved results over my usual photos.
Before...
 |
| Dark lighting. Flat imagery. Moody. Nice but distracting background. |
After...
 |
| More interesing angle. Cleaner background. More interest. Better composition (less wasted space). Still needs work. |
My 12 year old niece (who also makes jewelry) was watching me work on the new images on Picnik and helped give opinions as I tinkered around. It says something that after seeing the "After" image above, she shuddered when I showed her the "Before" image.
Problem: Because my items are meant to be worn, I really need to have them modelled.
(Possible) Solution: I've talked to two people about possibly modelling some of my pieces, a friend at work and my younger brother's fiance. They both seemed fine with the idea. Not sure how I would pay them. My friend said she didn't need money or a discount, but couldn't resist when I said I could give her free jewelry. What can I say? She likes my stuff! ;-)
I have a couple other people I can possibly talk to about modelling my items. I really do like keeping it to people I know, at least for now.
Problem: Promoting my items and finding more venues. I'm having a heck of a time finding vending events (like craft fairs and consignment shops). I also don't have the time to go to "local coffee shops on open mike nights" too often because of my busy schedule.
(Possible) Solution: Talk to some of the poeple I know who vend at events; they may be willing to give me ideas on how to find these things.
Problem: There's the idea of giving some of your items to well known singers and such and also possibly loaning some to local photographers in exchange for them to refer people your way (and free or discounted images of your items being used by models).
(Possible) Solution: Think about the people I do know and who they might know. My sister owns Cleopatra's Closet and she's also a well known belly dancer in her area. She has a lot of belly dancer friends, knows a number of photographers, and has connections throughout the US and abroad. She may be able to refer me to a few that I can contact. There's also a few other dancers I know. I may also have artistic connections in other areas as well. I need to put out my feelers.
Another possibility is to contact several of the authors/owners of the bigger blogs I visit and ask about doing a giveaway through them. It's a fast way to get exposure. Something to consider.
I think my biggest problem is... I don't promote myself enough. I have quality items and I am proud of what I make. I need to be more proactive about selling them.
The main thing is this (and this is what I told my husband today):
It's about creating, but what's the point in creating if you can't share it. How can I share it, though, if I can't fund it. That's why I need to sell more; so I can afford to get the supplies to create more.
Friday, January 27, 2012
New Etsy Store
I've decided to open a new storefront on Etsy. It felts too confusing for my store name (Melusine's Jewels) and my account name (mankycat) to be so different. Cohesiveness, I felt, was needed.
So, I'll be starting fresh. I didn't have much feedback on my old store front; people would forget to leave it or the item was sent as a gift to the recipient and not necessarily the gifter. I needed to take new pictures for all my current listings using the information I've gathered from my research. I'm doing a major overhaul. I may also phase out my mankycat blog... We'll see.
There's so much to take in. I really believe in my product and really believe it could do well.
As an aside, I've made two more birds nest necklaces. One is in gold and brown wire with turquoise stone beads and the other is made of wire in three shades of blue with two sades of blue beads and a grey-blue freshwater pearl. I'd post pictures... but I really want to get better pictures of them first.
Saturday, January 14, 2012
Bird Nest Necklace: First Attempt
Last night, I tried my hand at making a wired wrapped "bird nest necklace," using the tutorial from Lisa's Craft Blog. I saw this tutorial a couple days ago and thought it would not only be a nice challenge for someone who is just beginning to work with wire, but also a lovely gift for my friend over at My Handmade Wedding.

The tutorial has you use only one kind of wire, but I always have to try to do something different apparently. I used two colors of wire: 22 guage silver plates and 24 gauge gold tone. The two colors together make it work with different chains and makes the nest seem to shimmer more! It was quite a bit more work though and I did stab myself in my thumb, but there is this idea that art sometimes requires a bit of sacrifice (or a bit of blood). I didn't mind.
Here's a bit of back story: If you go to My Handmade Wedding, you'll see her theme is laid back but very sweet, based on her cake toppers, which are little blue birds. Her invites and gift tags have hand drawn birds on them, and her accent color seems to lean towards the color of blue of her cake toppers. My friend purchased necklaces from me for her helpers (who are similar to the standard bridesmaids) and for the mothers of the bride and groom, but I really wanted to make her some jewelry as a gift too (whether she chose to wear it or not). The dress she was originally going to use was best without jewelry, so we set that idea aside. She found a different dress (which is very lovely and very "her") and I found the tutorial for the 'bird nest necklace." When I showed her pictures of this style on Etsy, she seemed very excited by it. The birds nest necklace would fit the theme (and the style of her "hippie wedding dress") very well.
 She is leaning towards an antique gold tone, which will be a little difficult with the wire selections the craft stores have around here, as well as one of my online resources. I'll check a bit further online. One idea I had was to make her birds nest two tone using gold tone an brown wires or to simply stick to one of those two. The chain would still be antigued gold tone, so the nest colors would be affected by which hue of antigued gold I go with (different companies sometimes have different hues for this). The "eggs" in the nest will hopefully be the blue of her wedding theme, I just need to find some.
I'm also considering what other directions I can take these necklaces... I could do other, more mythical or fantasy based nest ideas. I'm also thinking of showing my oldest niece how to make them, since she works with wires more than I do and it could be a good way of stretching her creative muscles. I think this could be fun.
This is how my first attempt (the prototype I'm keeping) turned out!

The tutorial has you use only one kind of wire, but I always have to try to do something different apparently. I used two colors of wire: 22 guage silver plates and 24 gauge gold tone. The two colors together make it work with different chains and makes the nest seem to shimmer more! It was quite a bit more work though and I did stab myself in my thumb, but there is this idea that art sometimes requires a bit of sacrifice (or a bit of blood). I didn't mind.
Here's a bit of back story: If you go to My Handmade Wedding, you'll see her theme is laid back but very sweet, based on her cake toppers, which are little blue birds. Her invites and gift tags have hand drawn birds on them, and her accent color seems to lean towards the color of blue of her cake toppers. My friend purchased necklaces from me for her helpers (who are similar to the standard bridesmaids) and for the mothers of the bride and groom, but I really wanted to make her some jewelry as a gift too (whether she chose to wear it or not). The dress she was originally going to use was best without jewelry, so we set that idea aside. She found a different dress (which is very lovely and very "her") and I found the tutorial for the 'bird nest necklace." When I showed her pictures of this style on Etsy, she seemed very excited by it. The birds nest necklace would fit the theme (and the style of her "hippie wedding dress") very well.

I'm also considering what other directions I can take these necklaces... I could do other, more mythical or fantasy based nest ideas. I'm also thinking of showing my oldest niece how to make them, since she works with wires more than I do and it could be a good way of stretching her creative muscles. I think this could be fun.
Friday, January 13, 2012
Melusine's Jewels!
Welcome to my new blog, dedicated to my jewelry line, sales, and perhaps some creative inspirations. On my other creative blog, Sew Mankycat, I posted two entries regarding my blooming endeavors with making jewelry, working mainly with "fried marbles", which began approximately in July 2011. These endeavors have been flourishing, and spreading into new avenues of pursuit. I'm loving it!!!
The first two entries on the subject are Fried Marbles and Creative Movement.... The more I thought of it though, the more I felt I needed to keep my jewelry making and my other creative projects separate. My jewelry making and my other arts/crafts just feel so different that one seemed to weigh too heavily on the other.
Christmas was a busy time for me. I had constant orders coming in and was also making jewelry for my family, friends, co-workers, and my son's daycare teachers (actually everyone there since they all help with my children). That's a lot of work! Now, I'm in a lull of orders and can pursue other styles and ideas, which is great! I was getting a bit burned out and bored, but now am feeling a renewal of my interest. :-)
I plan to make a "birds nest necklace" this weekend using a tutorial I found via the The Southern Institute's "Creative Me Linky Party". I'll post more on this after I make one.
Subscribe to:
Posts (Atom)